
How To Install & Run the Shardeum Sphinx 1.1 Validator Node
Welcome to cryptomarketblog, number one blog for crypto education. Here we explain the topics of cryptocurrency using examples so that anyone can easily understand them. In this article we are going to show you how run the Shardeum Sphinx betanet node to get eligible for Shardeum Airdrop.
Shardeum is an EVM-based, linearly scalable smart contract platform that provides low gas fees forever while maintaining true decentralization and solid security through dynamic state sharding.
Shardeum has confirmed to launch its own token $SHM and hinted of doing an airdrop. They reserved 5% off total supply to Ecosystem / Airdrops and 51% node mining. There is speculation that who runs Shardeum Sphinx Betanet Node may get an airdrop after they launch the token.
Requirements to run Shardeum Sphinx 1.1 Validator Node are:
8 GB RAM + 8 GB Virtual Memory
Use Contab, pqhosting, vultr or digital ocean servers to setup a node. I recommend you to use Contab or pqhosting, in this example I am using Contab servers which is very cheap compared to all other VPS.
Go to Contab website https://contabo.com/en/vps/ and select “Cloud VPS S”, select your term length as 1 month or 3 months, select Image as Ubuntu latest version (Ubuntu 22.04 version), enter root password click on “next”, Fill the details and complete the payment. After payment it will take 5-10 mins to setup server, you will receive Gmail with your server details.

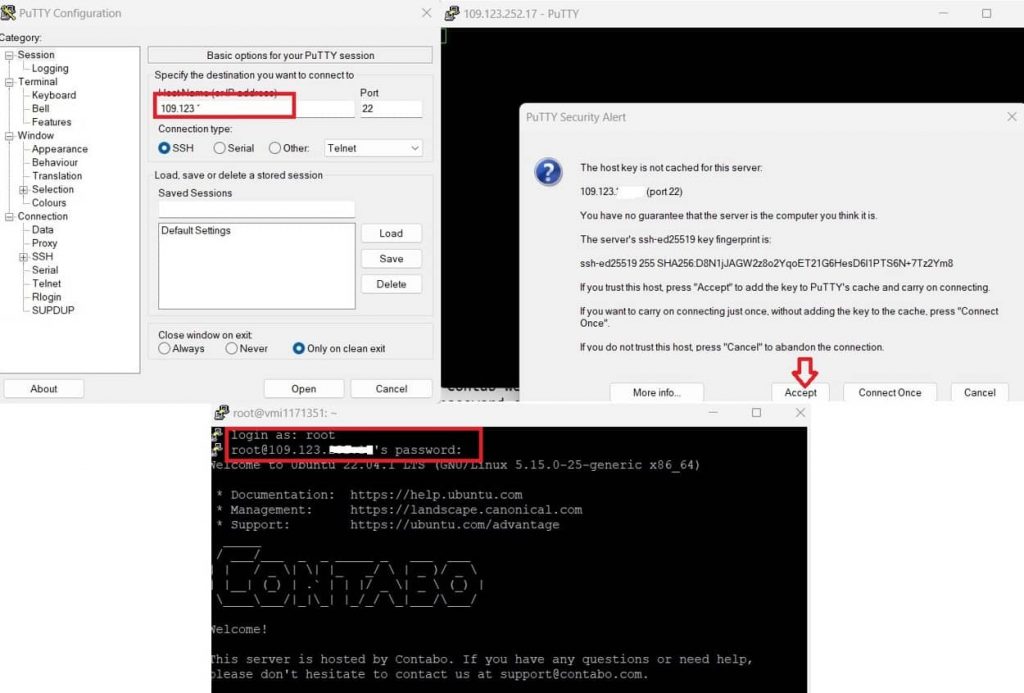
go to https://www.putty.org/, Download and install the putty, next open it and enter host name (your server IP address) and click on open and accept. Enter user id as root and enter the root password (Which you created while buying server).
Now you have VPS, you have to run the node. First update the packages.Copy this code and paste there (Remember just copy from here and take your mouse pointer to where is blinking green, and right click there and run the code by pressing enter if it does not run automatically).
sudo apt update && sudo apt upgrade -yInstall package managers
Run below code
sudo apt-get install curlUpdate package managers
Run below code
sudo apt updateInstall docker
Rub below command, after it runs completely it will ask you to choose between Y/N, press Y and then tap on ENTER key on your keyboard.
sudo apt install docker.ioCheck docker version
docker --versionInstall docker-compose
Run below command to install docker-compose
sudo curl -L "https://github.com/docker/compose/releases/download/1.29.2/docker-compose-$(uname -s)-$(uname -m)" -o /usr/local/bin/docker-composeSetup permissions for docker-compose
sudo chmod +x /usr/local/bin/docker-composeCheck docker compose version (should return version 1.29.2 or higher)
docker-compose --versionDownload and install validator
- Run below command to install validator.
curl -O https://gitlab.com/shardeum/validator/dashboard/-/raw/main/installer.sh && chmod +x installer.sh && ./installer.sh - then it will ask you By running this installer, you agree to allow the Shardeum team to collect this data. (y/n)?: type y and press enter.
- It will ask questions about your setup settings. Enter y to setup the web based dashboard, next Set a password for dashboard access (Remember this password).
- Next it will ask you to enter custom port (default 8080) just press enter. Next it will ask to set the first p2p port (default 9001) press enter, Next it will ask to set the second p2p port (default 10001) just press enter.
- Next it will ask custom path to install node just press enter.
- Wait for the installation process to complete.
CAUTION
If you are behind a router and you are using ports 9001 and 10001 for p2p communication, make sure ports 9001 and 10001, are forwarded (be careful doing this since it will modify your firewall):

https://www.noip.com/support/knowledgebase/general-port-forwarding-guide/

Reference:

https://gitlab.com/shardeum/validator/dashboard/
Open validator CLI
Go to the hidden Shardeum directory
Run below command.
cd .shardeumStart the CLI by running the following shell script
./shell.shOpen validator GUI
Run below command.
operator-cli gui startNode installation is completed, Next add sphinx 1.x network to your metamask wallet
Go to https://docs.shardeum.org/Network/Endpoints#connect-wallet and click on “Click to Connect to Sphinx 1.X” button then metamask pop-up will open with sphinx 1.x network details click on “Approve” to add network to metamask.
You can also add sphinx 1.x network to metmask manually by using below details.
Network Details
Network Name : Shardeum Sphinx 1.X
New RPC URL : https://sphinx.shardeum.org/
Chain ID : 8082
Currency symbol : SHM
Block Explorer URL : https://explorer-sphinx.shardeum.org/
Faucet funds
go to https://faucet-sphinx.shardeum.org/ and request funds if it won’t work go to shardeum discord channel and request funds at #faucet-1.0 channel.
Open validator dashboard and Stake testnet tokens
Go to your web browser and go to https://localhost:8080/ replace localhost with your VPS IP address ex: https://164.92.116.240:8080/ ignore this warning and continue to the validator dashboard. Enter password (Password used while installing node) and click on connect to open dashboard.

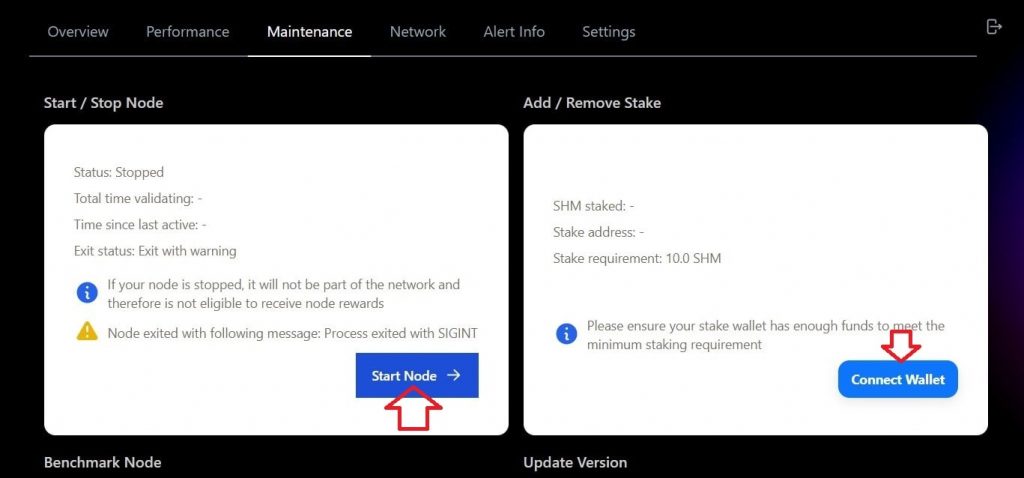
Go to the “Maintenance” page, then click the “Start Node” button in the top left white box, The node is running correctly if the “Start Node” button now says “Stop Node”.
After you start the validator, click on connect wallet to stake SHM tokens into your validator node.
After you connect your wallet click “Add Stake” then you will get below details
Stake Wallet Address [wallet connected]
Nominee Public Key [filled in automatically while validator is running]
Stake amount (SHM) [Stake at least 10 SHM]
Enter stake amount and click “Stake” then you get a metamask pop-up click “confirm” button to stake your SHM tokens successfully.
Reset your MetaMask if staking not works. Go to Settings > Advanced > Reset Account.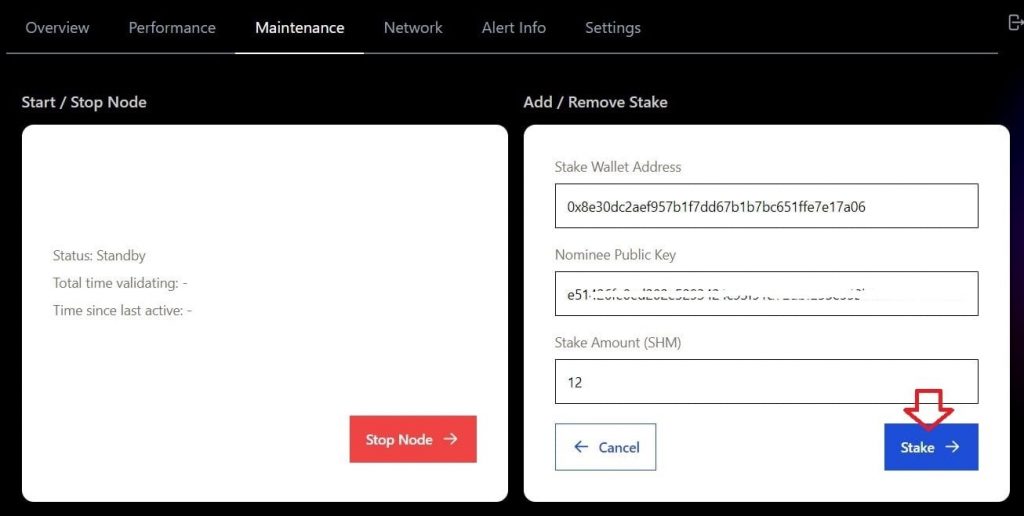
that’s it.